01

为什么 Lightroom 里看不到评分和旗标? Why don't I see ratings and flags in Lightroom?

慧眼选鸟 将评分写入照片的 EXIF/XMP 元数据中。如果照片已经导入 Lightroom,需要手动同步元数据: SuperPicky writes ratings to photo EXIF/XMP metadata. If photos are already imported in Lightroom, you need to manually sync metadata:

1 在 Lightroom 中选中需要同步的照片(或按 Cmd/Ctrl+A 全选) Select photos to sync in Lightroom (or press Cmd/Ctrl+A to select all)
2 菜单选择「元数据」→「从文件读取元数据」 Go to menu "Metadata" → "Read Metadata from Files"
3 确认对话框,Lightroom 将从文件读取最新的评分、旗标和标签信息 Confirm the dialog, Lightroom will read the latest ratings, flags and labels from files
💡 建议:在 Lightroom 偏好设置中开启「自动将更改写入 XMP」,这样元数据会自动双向同步。 Tip: Enable "Automatically write changes into XMP" in Lightroom Preferences for automatic two-way sync.
02

为什么飞鸟的绿色标签 / 精焦的红色标签不显示? Why aren't the green (BIF) / red (critical focus) labels showing?

慧眼选鸟 使用英文颜色名称(如 "Green"、"Red")写入标签。如果您的 Lightroom 使用不同的颜色标签集设置,标签可能无法正确显示。 SuperPicky uses English color names (e.g., "Green", "Red") for labels. If your Lightroom uses a different color label set, labels may not display correctly.

1 打开 Lightroom,选择菜单「元数据」→「颜色标签集」 Open Lightroom, go to menu "Metadata" → "Color Label Set"
2 选择「Lightroom 默认」或「Bridge 默认」 Select "Lightroom Default" or "Bridge Default"
3 如果使用中文版 Lightroom,可能需要选择「编辑...」,将绿色标签的文本改为 "Green",红色改为 "Red" If using localized Lightroom, you may need to select "Edit..." and change the green label text to "Green", red to "Red"
Green = 飞鸟照片 = BIF photo
Red = 精焦照片(对焦点在鸟头上) = Critical focus photo (focus point on bird head)
03

为什么看不到精选旗标(Pick Flag)? Why don't I see the Pick Flag?

精选旗标写入 XMP:Pick 字段。与评分一样,需要从文件读取元数据才能在 Lightroom 中显示: Pick flags are written to the XMP:Pick field. Like ratings, you need to read metadata from files to display them in Lightroom:

1 选中照片 →「元数据」→「从文件读取元数据」 Select photos → "Metadata" → "Read Metadata from Files"
📌 精选旗标仅授予 3 星照片中锐度和美学都排名前 25% 的交集,是最优秀的照片。 Pick flags are only given to 3-star photos that rank in the top 25% for BOTH sharpness and aesthetics - these are the best of the best.
04

为什么看不到排除旗标(Reject Flag)? Why don't I see the Reject Flag?

0 星照片会被标记为排除旗标(XMP:Pick = -1)。同样需要从文件读取元数据: 0-star photos are marked with a reject flag (XMP:Pick = -1). You also need to read metadata from files:

1 选中照片 →「元数据」→「从文件读取元数据」 Select photos → "Metadata" → "Read Metadata from Files"
🗑️ 在 Lightroom 中,您可以按 Cmd/Ctrl+Delete 删除所有带排除旗标的照片,快速清理 0 星废片。 In Lightroom, you can press Cmd/Ctrl+Delete to delete all rejected photos, quickly cleaning up 0-star rejects.
05

如何在 Lightroom 中按锐度或美学评分排序? How to sort by sharpness or aesthetics in Lightroom?

慧眼选鸟 将锐度和美学评分写入 XMP 的地理位置字段,可以在 Lightroom 中直接排序: SuperPicky writes sharpness and aesthetics scores to XMP location fields, which can be sorted directly in Lightroom:

XMP:City 锐度值(000.00 - 999.99) Sharpness (000.00 - 999.99)
XMP:State 美学评分(00.00 - 10.00) Aesthetics (00.00 - 10.00)
XMP:Country 对焦状态(精焦/合焦/偏移/失焦) Focus status (Critical/Good/Soft/Out-of-Focus)
💡 在 Lightroom 图库模块中,点击「视图」→「排序」→「城市」可按锐度排序,选择「州/省」可按美学排序。 In Lightroom Library module, click "View" → "Sort" → "City" to sort by sharpness, or "State" to sort by aesthetics.
06

如何重置选片结果? How to reset selection results?

慧眼选鸟 提供完整的重置功能,可以恢复文件位置和清除元数据: SuperPicky provides a complete reset function to restore file locations and clear metadata:

1 打开 慧眼选鸟,选择之前处理过的目录 Open SuperPicky, select the previously processed directory
2 点击「重置」按钮 Click the "Reset" button
3 所有照片将移回原始目录,评分、旗标、标签等元数据将被清除 All photos will be moved back to the original directory, ratings, flags, labels and other metadata will be cleared
⚠️ 重置后需要在 Lightroom 中重新「从文件读取元数据」才能看到清除后的状态。 After reset, you need to "Read Metadata from Files" in Lightroom again to see the cleared state.
07 V4

V4 系列有什么重大功能更新? What's new in V4 series?

V4 系列是一个跨越式的重大更新,搭载了全新的 OSEA 核心模型: V4 series is a major leap forward, powered by the new OSEA core model:

SuperPicky V4 Interface
  • 全平台原生支持 - 深度优化 Apple Silicon (M1/M2/M3/M4) 与 Windows CUDA 架构。 Native Support - Deeply optimized for Apple Silicon (M1-M4) and Windows CUDA.
  • 全新 OSEA AI 引擎 - 基于 ResNet34 骨干网的 OSEA 模型,自动识别全球 11,000+ 鸟种,写入 IPTC 元数据。 New OSEA AI Engine - ResNet34-based OSEA model to identify 11,000+ species globally, writes to IPTC metadata.
  • Lightroom 插件 - 无需离开 Lightroom 即可识别鸟种 Lightroom Plugin - Identify birds without leaving Lightroom
  • eBird 集成 - 根据 GPS 位置过滤当地不可能出现的鸟种 eBird Integration - Filter impossible species based on GPS location
  • 鸟种分类目录 - 按识别的鸟种自动创建子目录整理照片 Species Folders - Auto-organize photos into species subdirectories
  • 系统托盘 - 支持后台运行,隐藏 Dock 图标 System Tray - Background mode with hidden Dock icon
  • 自动更新 - 启动时自动检查新版本 Auto Update - Check for updates on startup
  • CLI 工具 - 命令行版本支持完整功能和鸟类识别 CLI Tool - Full-featured command line interface with bird ID
💡 支持 macOS Apple Silicon (M1/M2/M3/M4) 和 Intel 处理器。 Supports macOS Apple Silicon (M1/M2/M3/M4) and Intel processors.
08 V4

如何安装和使用 Lightroom 插件? How to install and use the Lightroom plugin?

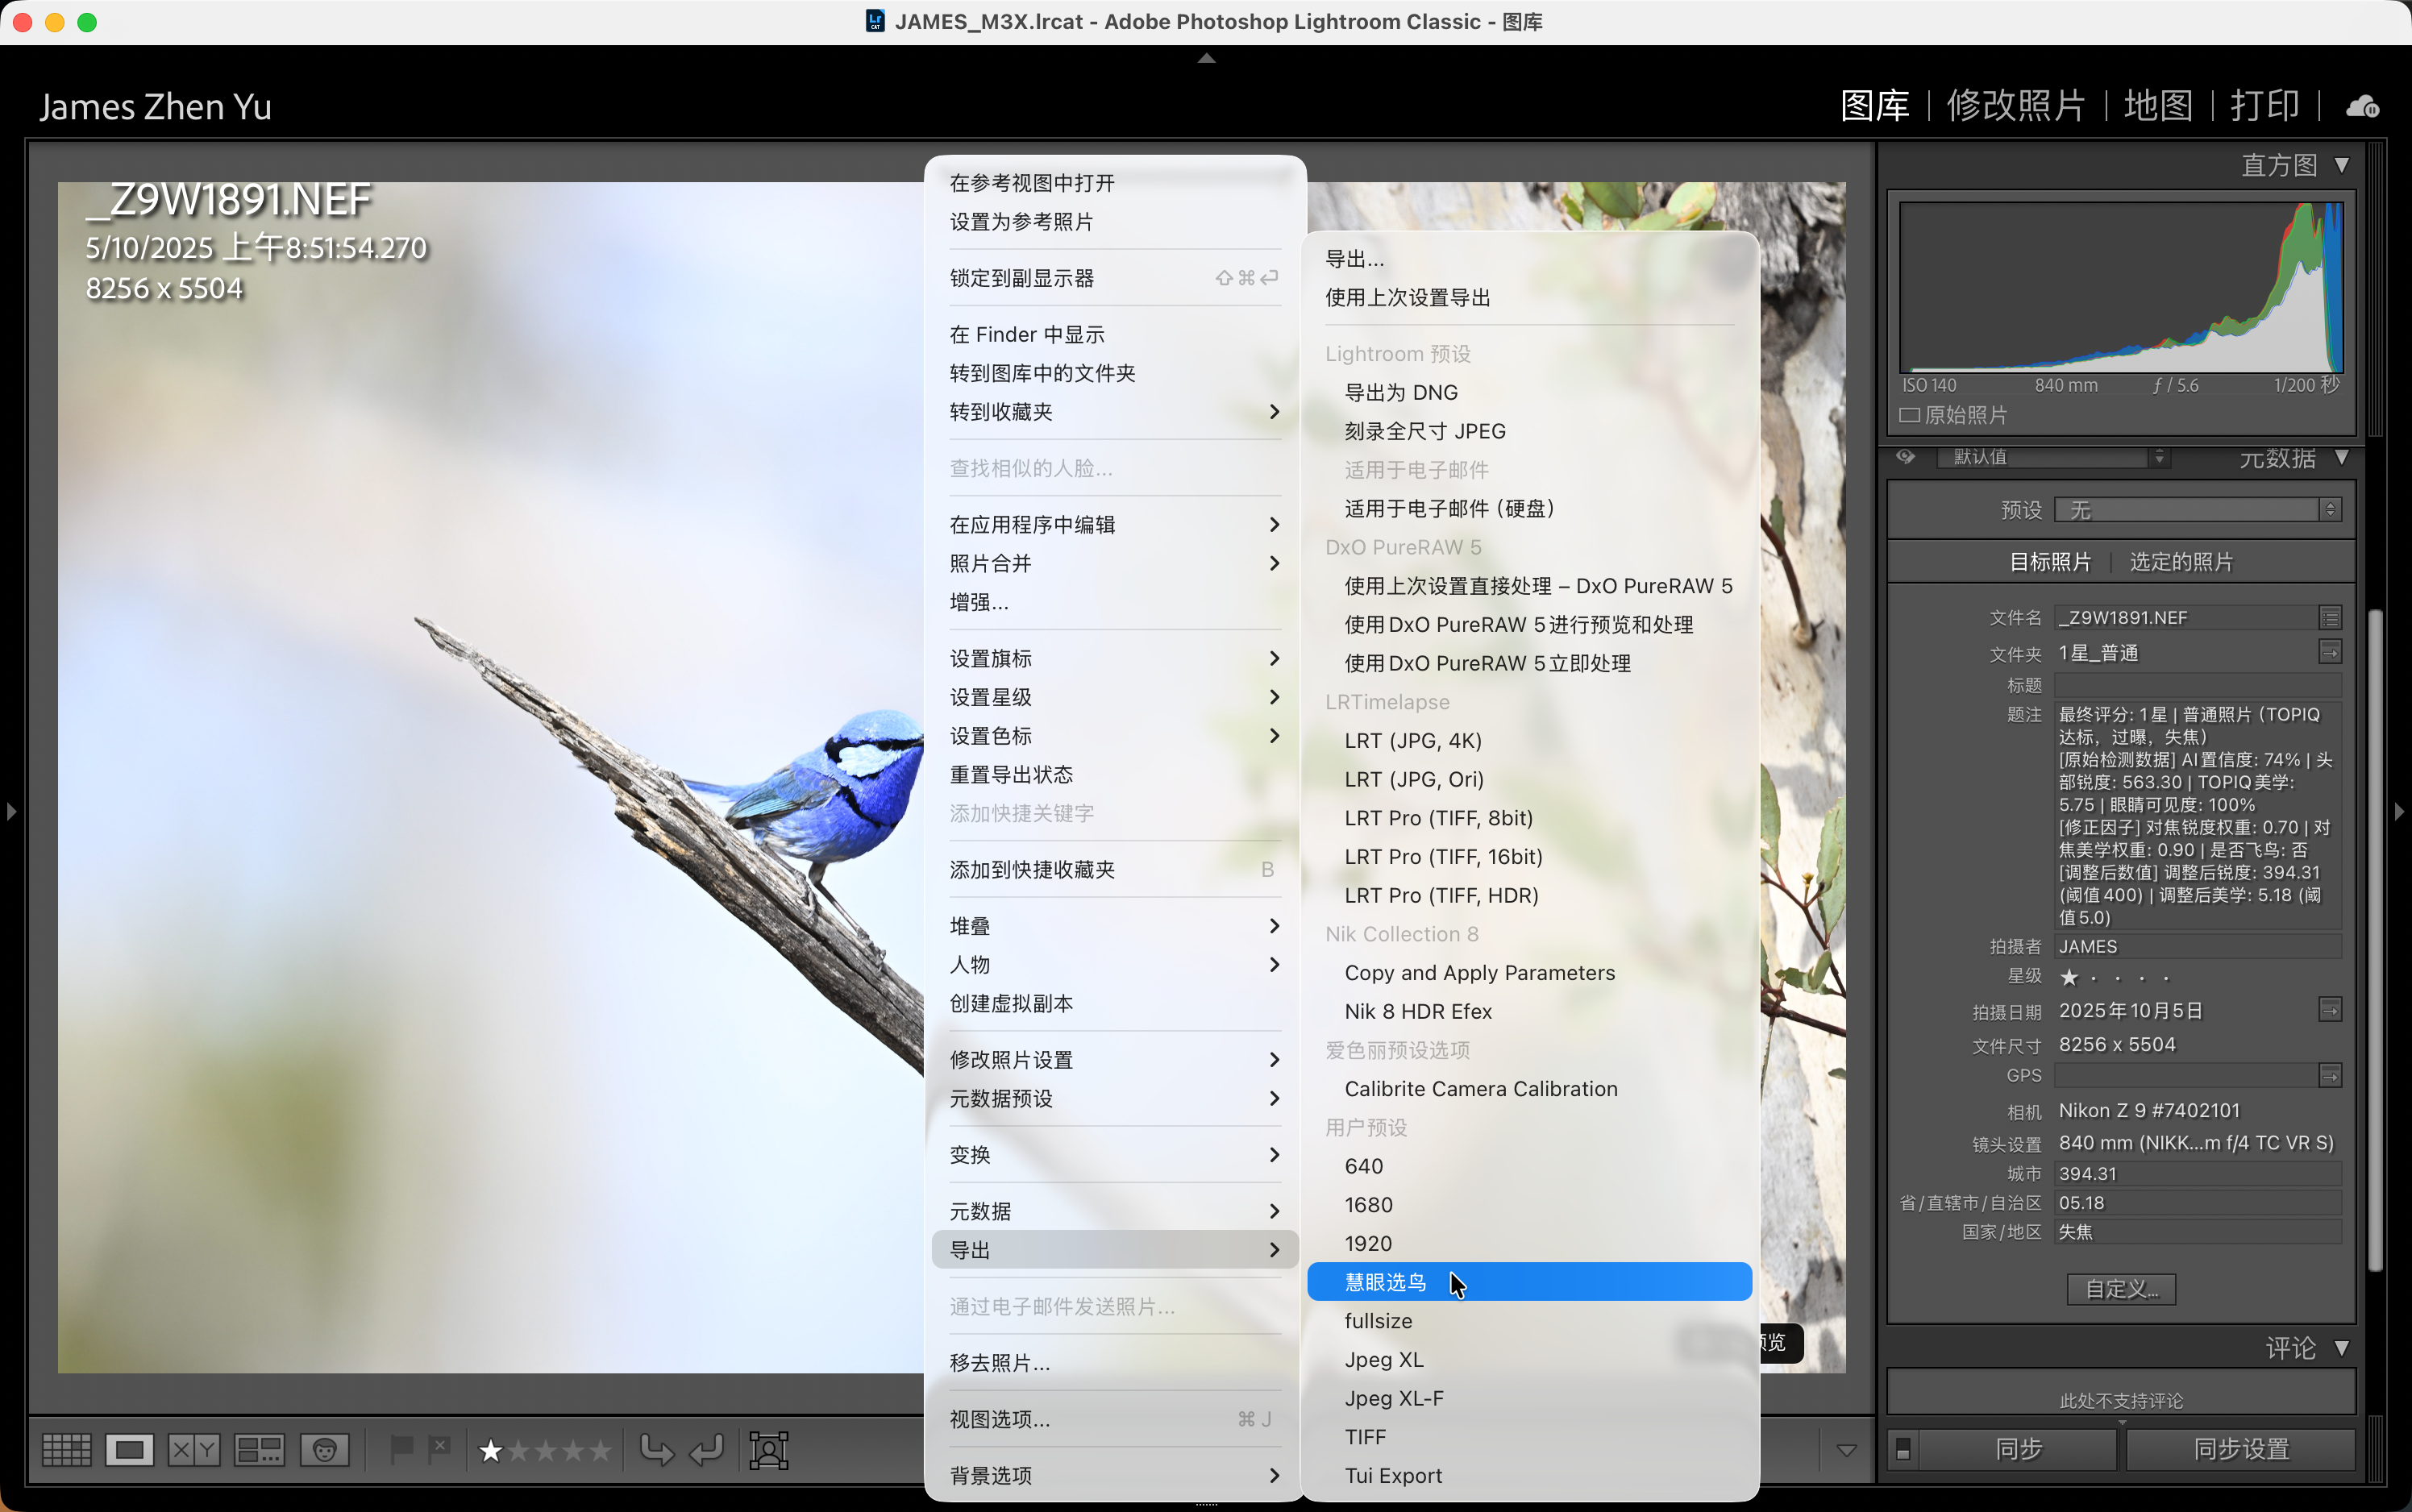
V4.0.0 安装时会自动部署 Lightroom Classic 插件。如果需要手动添加: V4.0.0 installer automatically deploys the Lightroom Classic plugin. To add manually:

Lightroom Plugin
1 打开 Lightroom Classic「文件」→「增效工具管理器」 Open Lightroom Classic "File" → "Plug-in Manager"
2 点击「添加」,选择 ~/Library/Application Support/Adobe/Lightroom/Modules/SuperBirdID.lrplugin Click "Add", navigate to ~/Library/Application Support/Adobe/Lightroom/Modules/SuperBirdID.lrplugin
3 确保 慧眼选鸟 应用正在运行,且「识鸟 API」开关已开启 Ensure SuperPicky app is running with "Bird ID API" enabled
4 选中照片,使用「图库」→「增效工具」→「慧眼选鸟 - 识别当前照片」 Select photos, use "Library" → "Plug-in Extras" → "SuperPicky - Identify Bird"
💡 识别结果会自动写入 Lightroom 的关键字、标题和简介字段,无需手动同步元数据。 Results are automatically written to Lightroom keywords, title and caption fields, no manual sync needed.
09 V4

如何使用命令行工具 (CLI)? How to use the Command Line Interface (CLI)?

V4.0.0 提供完整的命令行工具,支持所有核心功能: V4.0.0 provides a full-featured CLI supporting all core functions:

# 处理照片目录
python superpicky_cli.py process ~/Photos/Birds

# 自定义阈值处理
python superpicky_cli.py process ~/Photos/Birds -s 600 -n 5.2

# 处理时自动识别鸟种
python superpicky_cli.py process ~/Photos/Birds --auto-identify

# 重置目录
python superpicky_cli.py reset ~/Photos/Birds

# 重新评星
python superpicky_cli.py restar ~/Photos/Birds -s 700 -n 5.5

# 识别单张照片的鸟类
python superpicky_cli.py identify ~/Photos/bird.jpg

# 识别并写入EXIF
python superpicky_cli.py identify bird.NEF --write-exif
💡 CLI 支持纯 JPG 文件夹的自动识别处理,适合批量处理大量照片。 CLI supports auto-identification for JPG-only folders, ideal for batch processing.
10 V4

如何使用系统托盘后台运行? How to use system tray for background mode?

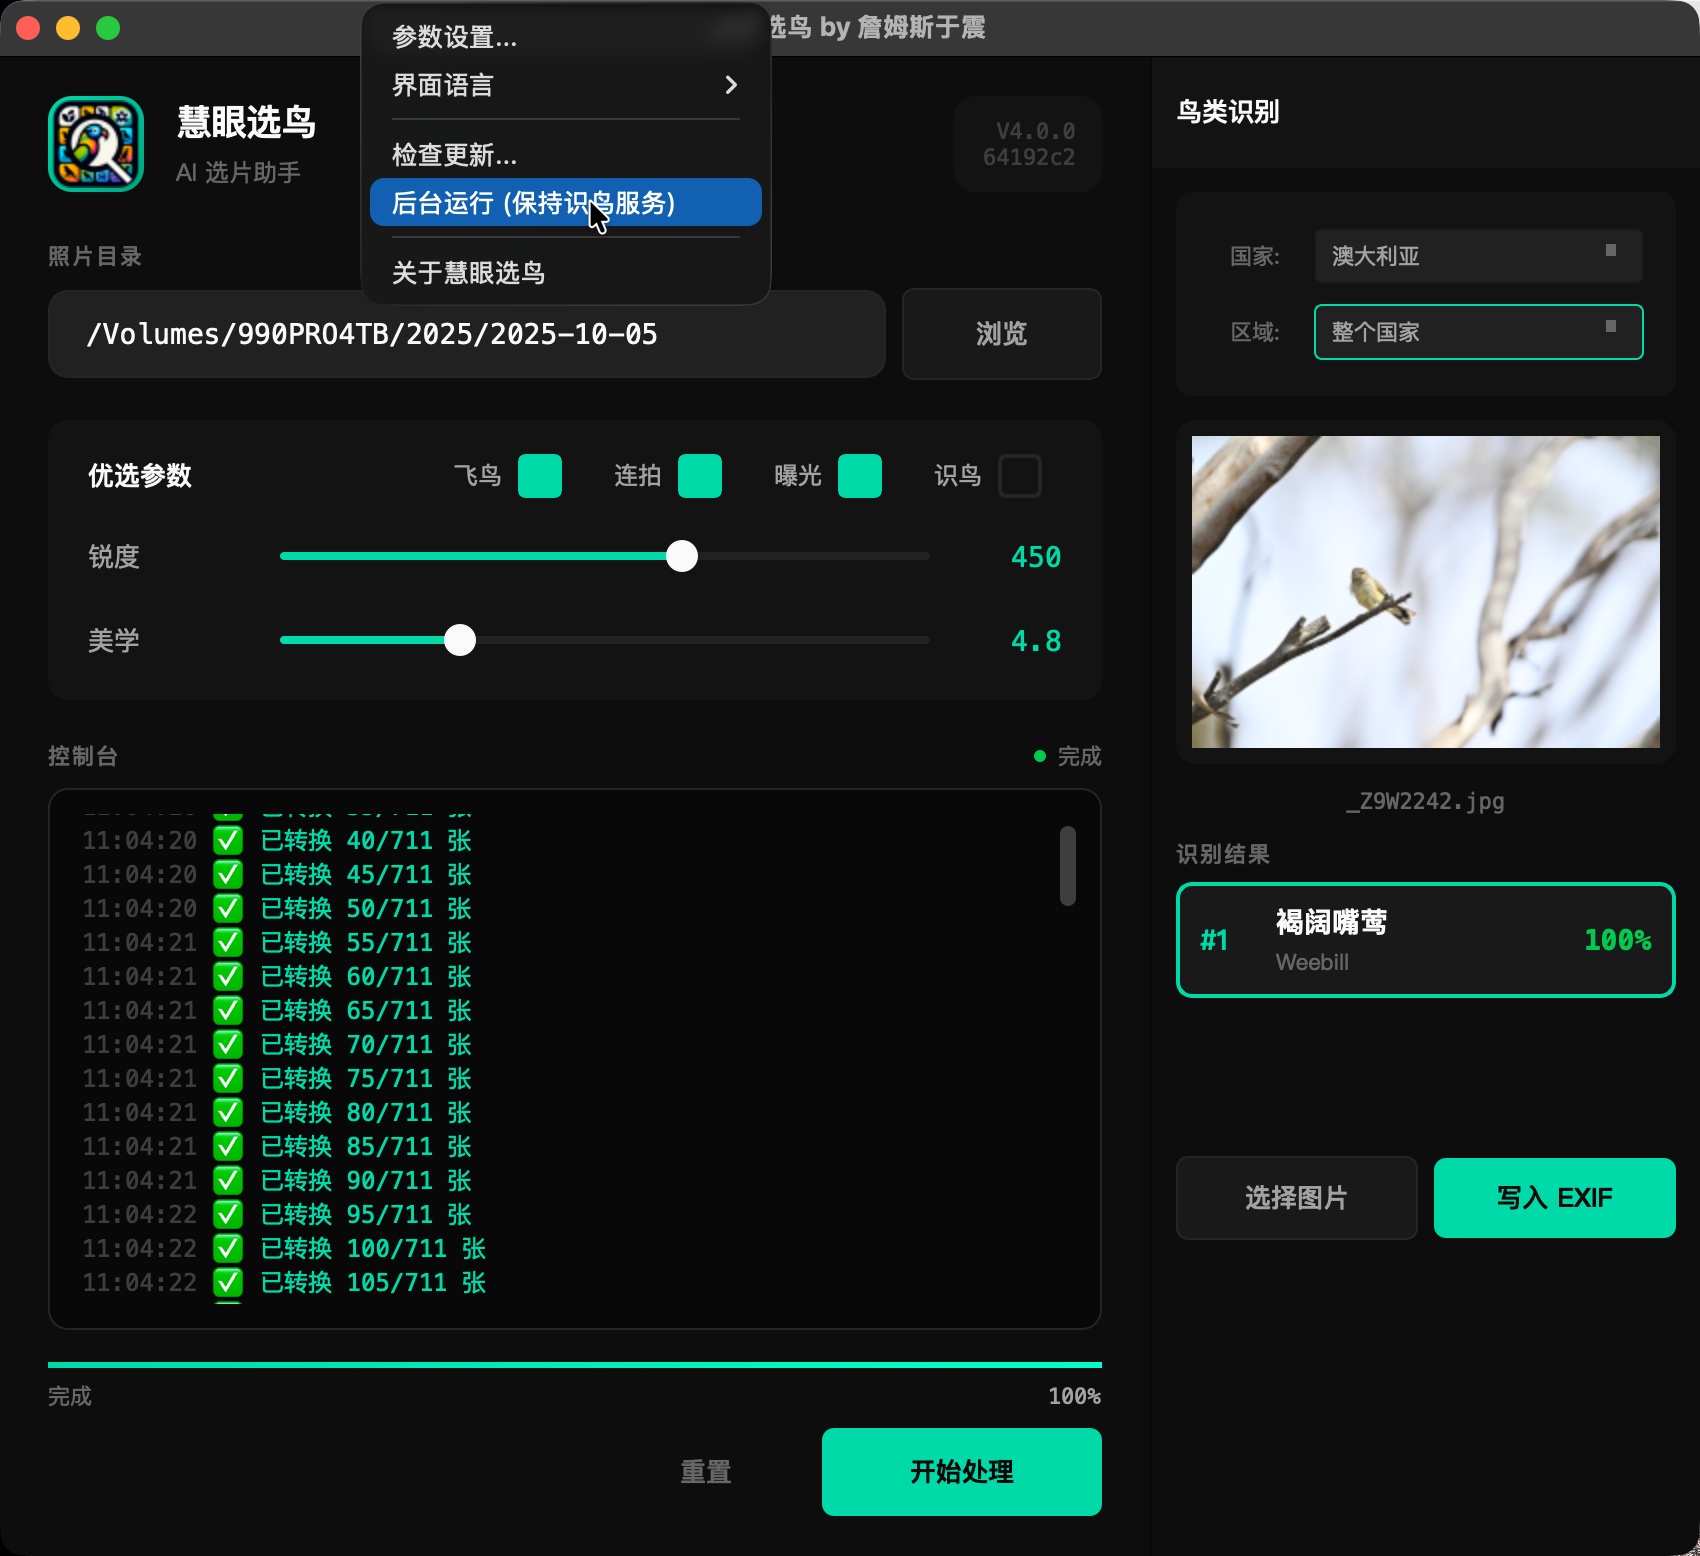
V4.0.0 新增系统托盘功能,支持后台运行: V4.0.0 adds system tray support for background mode:

System Tray
1 点击主窗口右上角的「最小化到托盘」按钮 Click "Minimize to Tray" button at top-right of main window
2 应用会隐藏主窗口并在菜单栏显示图标 App hides main window and shows icon in menu bar
3 点击菜单栏图标可以显示窗口或退出应用 Click menu bar icon to show window or quit app
💡 后台运行时 Lightroom 插件仍可正常使用,无需保持主窗口打开。 Lightroom plugin works in background mode without main window open.
11 V4

如何按鸟种自动分类照片? How to auto-organize photos by species?

启用鸟种识别后,照片可按识别的鸟种自动分类到子目录: With bird ID enabled, photos can be auto-organized into species subdirectories:

Species Folders
1 在主界面勾选「启用鸟种识别」 Check "Enable Bird ID" in main interface
2 勾选「按鸟种分目录」选项 Check "Organize by Species" option
3 处理完成后,照片将按「中文名_英文名」格式创建子目录 After processing, photos are organized into "Chinese_English" named folders
📁 RAW+JPEG 配对文件会同时移动到对应的鸟种目录中。 RAW+JPEG pairs are moved together to the species folder.
12 V4

什么是 Avonet / eBird 双重过滤? What is Avonet / eBird double filtering?

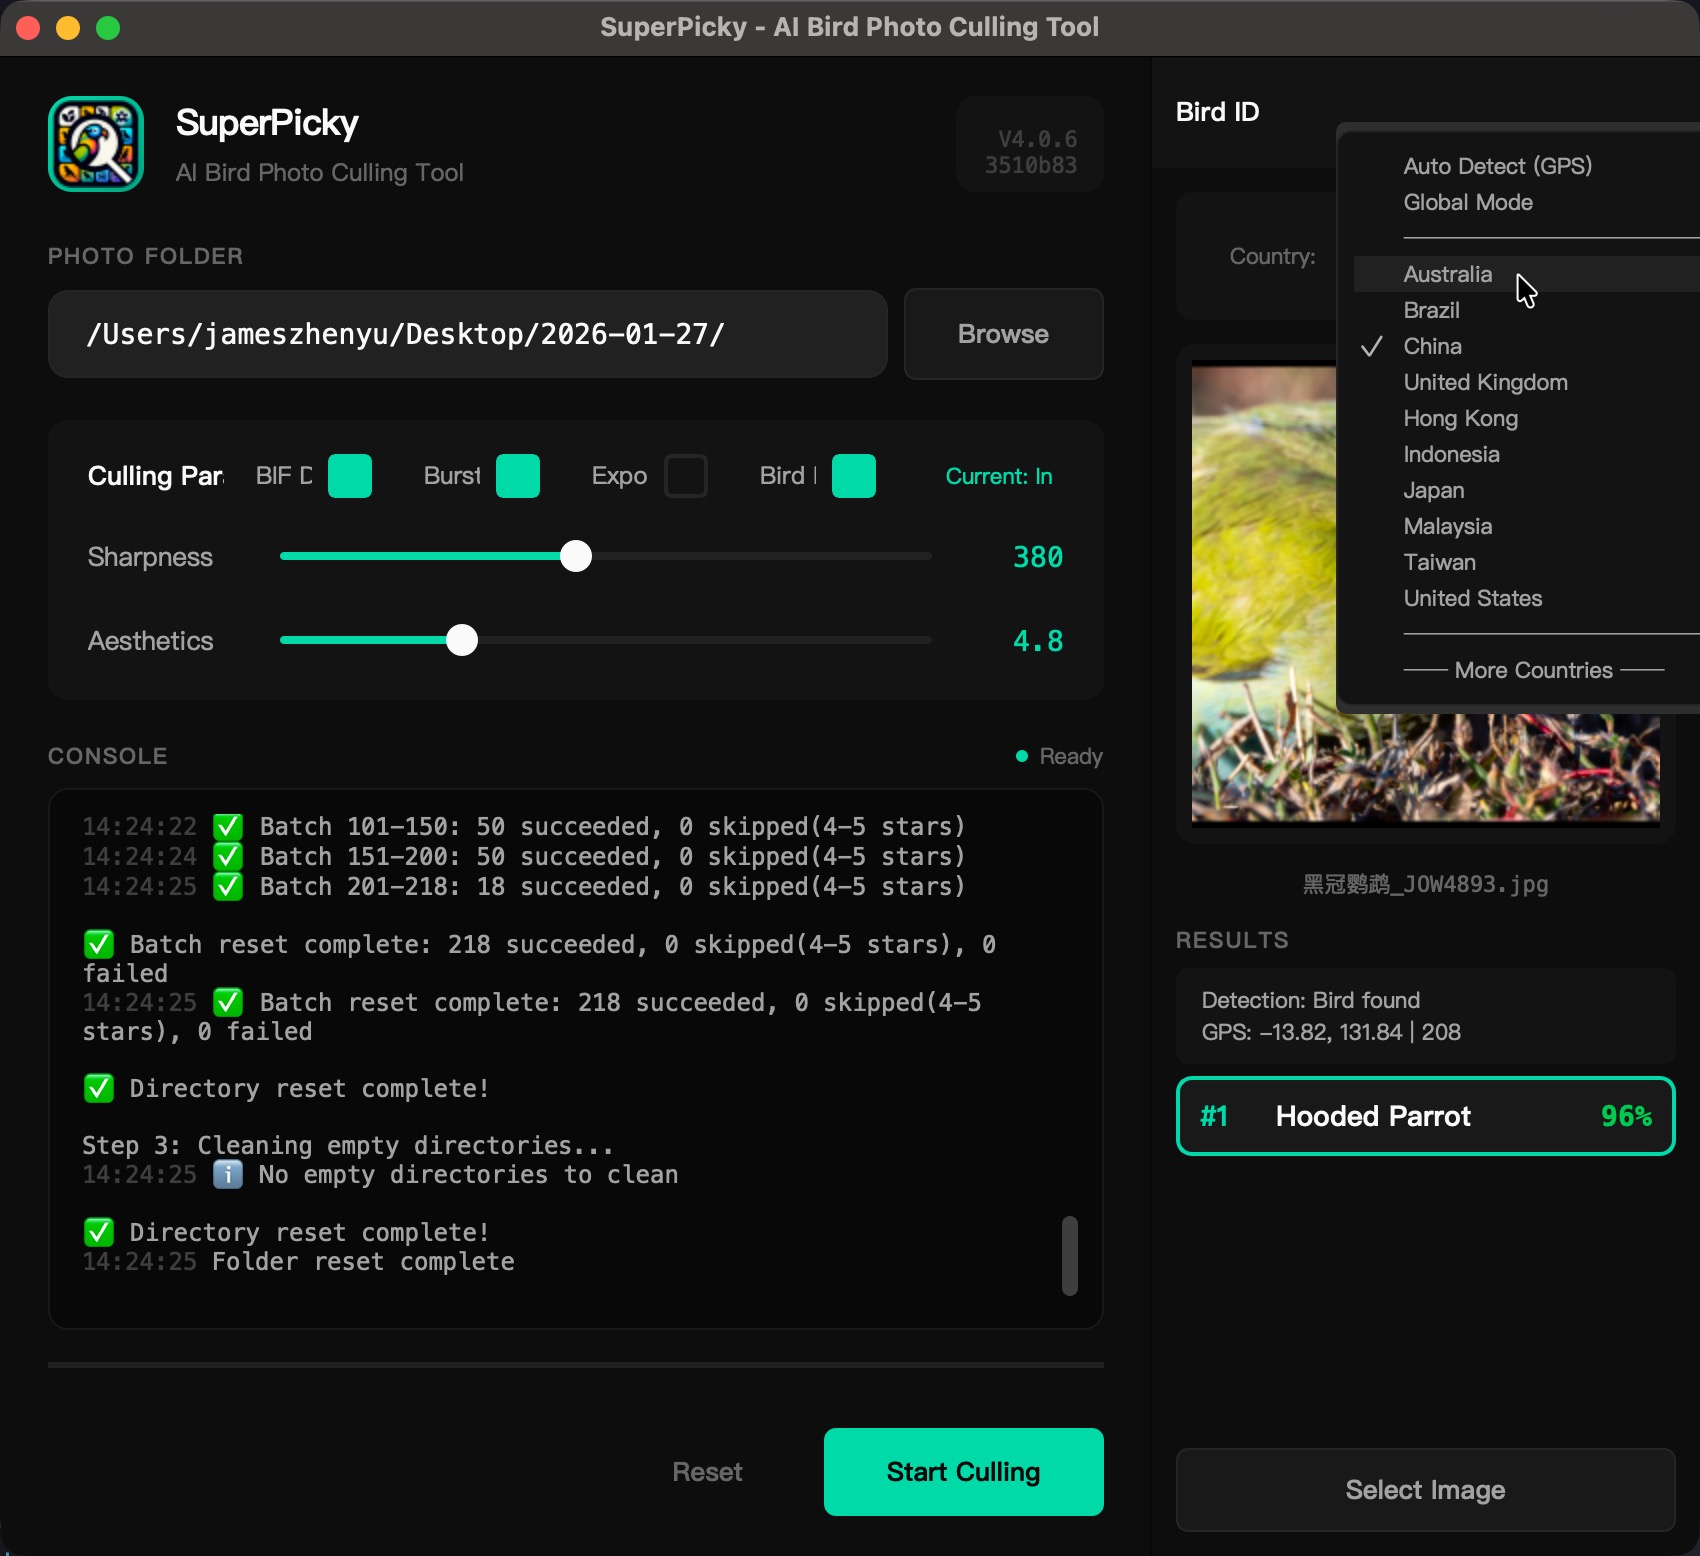
慧眼选鸟 采用了强大的双重地理空间数据过滤,以解决 AI 模型的幻觉误差: SuperPicky uses powerful dual geospatial data filtering to solve AI model hallucinations:

Avonet / eBird Integration Avonet / eBird Integration
  • 首选 Avonet 离线库 - 内置基于详尽繁殖区的 GPS 数据,提供零延迟高精度的本地过滤。 Primary: Offline Avonet DB - Built-in extensive breeding area GPS data for zero-latency local filtering.
  • 后备 eBird 在线数据 - 作为全球最大鸟类观测数据库,提供极罕见鸟种的交叉验证和补充。 Backup: Online eBird Data - The world's largest database, used for cross-validation and rare species supplement.
  • GPS 自动检测 - 如果照片包含 GPS 信息,系统全自动过滤当地不可能分布的鸟类。 GPS Auto-detect - Auto-fetches local species list if photo has GPS.
🌍 建议始终开启地区过滤(首选 Avonet),它能将常见鸟种的 Top-1 识别准确率硬生生拔高至 98.7%。 Recommend always enabling region filter (Avonet preferred), significantly improving Top-1 accuracy to 98.7%.
13

Photoshop 或 Bridge 可以使用吗? Can I use Photoshop or Bridge?

慧眼选鸟 的评分和元数据功能与 Adobe Bridge 和 Photoshop 完全兼容: SuperPicky's rating and metadata features are fully compatible with Adobe Bridge and Photoshop:

  • Bridge 完全支持 - 评分、标签、旗标在 Bridge 中都可以正常显示和排序 Full Bridge Support - Ratings, labels, flags display and sort correctly in Bridge
  • Photoshop 可读取 - 通过「文件」→「文件简介」可查看鸟种识别结果 Photoshop Readable - View bird ID results via "File" → "File Info"
  • 颜色标签兼容 - 建议使用「Bridge 默认」标签集以获得最佳兼容性 Label Compatible - Use "Bridge Default" label set for best compatibility
⚠️ 注意:Lightroom 插件仅适用于 Lightroom Classic,无法在 Bridge 或 Photoshop 中使用。但您仍可使用主程序处理照片后在 Bridge 中查看结果。 Note: The Lightroom plugin only works with Lightroom Classic. However, you can still process photos with the main app and view results in Bridge.
14 V4

首次运行加载速度的说明 Note on first launch loading speed

从 V4.0.6 开始,系统架构经过底层优化,冷启动性能已大幅提升: Starting from V4.0.6, architecture is heavily optimized, drastically improving cold start performance:

  • 首次启动优化 - 系统只需在首次启动时将多个 OSEA 模型载入显存,耗时相比旧版本大大缩短。 First Launch Optimization - OSEA models are loaded into VRAM only once. Time varies by device.
  • 后续启动 - 模型一旦缓存,识别速度达到极速。 Subsequent Runs - Once cached, identification is blazing fast.
  • 极速推理 - 通过 Apple Silicon 与 CUDA 硬件加速,推理能力高达 200+ FPS(基于1080p)。 Fast Inference - Hardware acceleration achieves 200+ FPS (1080p scale).
💡 建议:使用系统托盘功能让应用在后台运行,随时快速响应。 Tip: Use system tray to keep the app running in the background.
15 V4

AI 鸟种识别不准确怎么办? What if AI bird identification is inaccurate?

以下方法可以显著提高识别准确率: These methods can significantly improve identification accuracy:

1 开启 eBird 过滤 - 根据拍摄地点过滤掉当地不可能出现的鸟种,大幅提高准确率 Enable eBird Filter - Filter out species impossible at your location, greatly improving accuracy
2 选择正确的地区 - 确保照片有 GPS 信息,或手动选择正确的国家/省份 Select Correct Region - Ensure photos have GPS data, or manually select correct country/state
3 使用清晰照片 - 模糊、遮挡或距离过远的照片会降低识别准确率 Use Clear Photos - Blurry, obscured, or distant photos reduce accuracy
4 查看置信度 - 高置信度的结果更可靠,低置信度建议人工复核 Check Confidence - High confidence results are more reliable, low confidence needs manual review
🎯 AI 模型支持全球 11,000+ 鸟种,但相似物种(如不同地区的亚种)可能需要专业知识辅助判断。 AI model supports 11,000+ species worldwide, but similar species (like regional subspecies) may need expert knowledge.
16 V4

鸟种识别结果写入了哪些元数据? What metadata fields are written for bird ID?

鸟种识别结果会写入以下 IPTC/XMP 元数据字段: Bird identification results are written to these IPTC/XMP metadata fields:

Keywords 中文名、英文名、学名 (如:红嘴蓝鹊, Red-billed Blue Magpie, Urocissa erythroryncha) Chinese name, English name, Scientific name
Title 中文名 | 英文名 | 学名 Chinese Name | English Name | Scientific Name
Caption 鸟种简介描述(来自数据库) Species description (from database)
💡 这些元数据在 Lightroom、Bridge、Photoshop 中都可以搜索和筛选,方便后期管理鸟类照片库。 These metadata fields are searchable in Lightroom, Bridge, and Photoshop for easy bird photo library management.
17 V4

Windows 版本支持情况说明 Windows version support details

是的!自 V4.0.6 起,Windows 版本已退出 Beta 测试,提供全面而稳定的支持,针对不同硬件双轨并行: Yes! Since V4.0.6, the Windows version is officially supported for broad hardware integration:

  • CUDA GPU 加速版 - 专为包含 Nivida 显卡的系统设计,尽享满血版 AI 识别性能。 CUDA GPU Version - For systems with Nvidia GPUs to enjoy full AI performance.
  • CPU 基础版 - 适用于不具备独显的 Windows 或者旧系统,完全兼容所有核心选片逻辑。 CPU Only Version - For laptops or older systems without dedicated GPUs.
  • 完整生态支持 - CLI 命令行工具与核心功能在 Windows 端等价于 macOS 旗舰性能。 Total Ecosystem Support - CLI tools and features perform equally well.
📢 您可前往官网下载区选择对应版本的安装包 ZIP。 You can choose the corresponding package from the download section.
18 V4

(双达标,精焦)与(双达标,合焦)是什么含义? What does "Dual Qualify, Critical Focus" and "Dual Qualify, Good Focus" mean?

这是 慧眼选鸟 评估照片的最核心机制。双达标指的是在一组连拍或者相似姿态组别中,该照片的锐度 (Sharpness)美学评分 (Aesthetics) 参数同时达到了极高标准(通常是前 25%)。在此基础上: This is the core evaluation mechanism. Dual Qualify means the photo simultaneously reached the Top 25% in its burst sequence for both Sharpness and Aesthetics. Furthermore:

  • (双达标,精焦) - 照片除了同时满足高锐度与高美学构图,并且智能对焦点识别算法确认对焦点完美落实在了鸟的眼睛或头部。这是最完美的顶级成片。 (Dual Qualify, Critical Focus) - Top quality, and the focus point accurately lands on the bird's eye or head.
  • (双达标,合焦) - 照片满足了高锐度与高美学构图的双重标准,但是对焦点位于鸟体躯干、翅膀边缘。整体非常清晰锐利,但焦点没有绝对落在眼部。 (Dual Qualify, Good Focus) - Top quality, but the focal point landed strictly on the body/wings instead of the head. Very sharp overall.
在 Lightroom 中,(双达标,精焦)会被自动打上红色颜色标签以及精选旗标(Pick Flag)! In Lightroom, "Critical Focus" photos will be tagged Red with a Pick Flag!